Translate

Friday, May 17, 2019

Pavlova


Has it been more than two years already since I've lain dormant?  Really?  Two whole years?!! Oh my... then it's about time that I make a come-back, don't you think ?😊

It's been a hectic time for me in the last couple of years juggling an ever-challenging and demanding career while balancing time with the family.  Finally I decided to pull down the curtain and take a breather from the rat-race life to fully concentrate on the family.

And now that I'm off the 'work-force' and spending time to be a full-time home minster (for now) for the past one year, I'll try to find some time to start blogging again.  May take a while to get back in the groove again.

I have to admit that I'm quite lazy to start writing again and editing and uploading the photos too.. 😁
In fact, when I opened my blog I stared at it for a while trying to figure out how do I navigate and start a new post not to mention that I am at a loss for words too... lol.  Also, wanted to change the look and feel of my blog to start anew! See... I'm a bit rusty.

Every now and then I do miss the work-life especially my friends and 'social lunches' and feeding them with my goodies.  Not to mention the month end pay check too... sigh!  Well, you have to sacrifice some and gain some right!  I do however, get together with my ex-colleagues who became my close and good friends for lunch or weekend tea whenever their busy schedule permit.  I, on the other hand, is keeping 'me'-self pretty busy too playing the dotting mom and cooking and ferrying my kids from school and tuition.

So, I've not been the 'lady-of-leisure' as some of my friends put it.  Being a home minister is not a glamorous job 👩‍🍳👩‍🌾.  You are constantly planning, executing, implementing, budgeting and sweating 😅 (literally due to no air conditioning unlike at the office).  Well, every job has it's perks and challenges even a non-wage job 🤣 but the returns is high.   Life is even busier than when I was a career woman but this is a 'nice and satisfying' kinda busy feeling if you know what I mean. 😉
I am actually enjoying my new role especially when I was not able to do this when my children were younger.  Better late than never.

Anyways,  that's my brief 'what's been going-on with my life of late' for you.. 😜😜😜

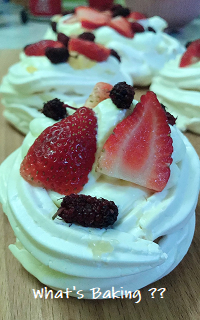
So to start off after missing in action, here's a dessert which I recently baked.. Pavlova.

This is my second try at baking this pav.  The first was a week ago and by popular demand from hubby, here's the second bake.  I always thought that it's difficult to bake this dessert but actually it's quite simple.  The important part was to whip the egg whites well but not to over beat them.  Bake them at very slow oven for more than an hour and you'll get a crispy white shell with a soft marshmallow-like center.  Fill it with whipped cream after it's cooled and throw in some berries or any fruits that you like.  Goes well with a little lemon curd if you have them.
Enjoy...!


You will need ...
6 egg whites at room temperature
1 cup sugar
2 tsp corn starch
1/2 tbsp lemon juice
1/2 tbsp vanilla extract

Frosting...
1.5 cup cold heavy whipping cream } whipped till soft peaks
2 tbsp sugar }

Topping...
mixed berries or kiwis or peaches etc

Here's how...
1. Pre-heat oven to very low at 115 degree Celsius.  Line a baking tray with a baking parchment paper and draw one 8inch circle or six 4inch circles for a mini pavs.  Turn the paper over with the drawings facing down.

2. Using a stand mixer, beat the 6 egg whites on high speed for 1 min until soft peak forms.  With mixer running, gradually add 1 cup of sugar and beat for 10 mins on high until stiff peaks form.  Mixture will be smooth and glossy.

3. Use a spatula to quickly fold in the lemon juice, vanilla extract and the corn starch.  Mix well.

4. Pipe the meringue onto the parchment paper following the circles to form a nest.  Level the bottom with spatula and bake for 1 hour and 15 mins until the outer meringue is crispy.  Turn off the oven and leave it in the oven with door close for another 30 mins to let it dry.  The outside outside will be dry and crisp to the tap and pale cream color (almost white) and the inside will be marshmallow soft.

5. Transfer the pav with the parchment paper on the counter or cookie rack to cool at room temperature.  Once cool, top it with whipped cream and fruit.

The pavlova shell can be stored in an airtight container and leave at room temperature for 3-5 days.

There! I made it.  My 'come-back' post after two long years.  (Good job! Giving myself a pat on my shoulder for completing this and posting it 👍)
Let's not wait for another two years shall we.. 😉😎

Until then.. see ya again.. soon.. I hope ... errr... bye!


Monday, January 2, 2017

Jam Filled Sour Cream Bundt Cake

HAPPY NEW YEAR 2017, Everyone!
 A blessed new year with good wishes and lots of love throughout the year 😚💑


To start off this year, I baked a bundt cake filled with mixed berry jam. A satisfying, moist and soft cake to make your day.
This recipe is adapted from my all time favorite book 'Piece of Cake'.
Enjoy!


So here's the snapshot of the recipe since no adjustment is required to this recipe except for the sweetness of the cake. I reduced to 1 1/2 cup sugar.  And I am a lazy person to type the recipe. 😁😎😆


Sunday, October 30, 2016

Halloween 2016

Happy Halloween everyone!
My favorite time of the year to put on my creative witch's hat and have fun with my kids.  The cuppies are too cute to be scary 😃.
 Let's take a look.


Saturday, June 25, 2016

Marble Pound Cake

If you are looking for a moist, soft and chocolaty marble cake, look no further. This is THE one! Thanks to Anna Olson, I have found the perfect marble cake.

This cake is not too big or too rich. It is certainly moist and soft and the size is just right.


3/4 cup (185 ml) unsalted butter
1 cup sugar
4 eggs
2 tsp vanilla extract
2 cups all purpose flour
1 1/4 tsp baking powder
1/4 tsp salt
2/3 cup (160 ml) sour cream
4 oz (120g) bittersweet choc, chopped and melted

1. Pre heat oven to 160 degree celsius. Grease 9 x 5 inch loaf pan and dust with flour, tapping out any excess.
2. Using electric mixer beat butter and sugar untill light and fluffy about 2 mins. Add eggs one at a time, beating wella after each addition. Stir in vanilla.
3. In separate bowl, sift and whisk flour, baking powder and salt. Add this to the butter mixture, alternating with sour cream and blending well after each addition, starting and finishing with flour. Scrape half if this mixture into another bowl.
4. Melt the chocolate and add warm chocolate to one bowl of the batter and stir until blended. Dollop vanilla batter and chocolate batter in alternate spoonfuls into pan.  Use a paring knife to swirl the batter.
5. Bake the cake for 60 to 70 mins until a tester inserted in the center of the cake comes out clean. Cool cake for 30 mins in the pan, then turn cake out to cool completely.

Sunday, May 8, 2016

Sugee Butter Cake for Mother's Day

It's Mother's Day today!
HAPPY MOTHER'S DAY to all of you wonderful mothers out there. This is an extra special day to be pampered.


My day started a day earlier.  My family treated me with a scrumptious BBQ steamboat dinner last nite and gave me a present too. A cake recipe book called Grandbaby Cakes by  food blogger Jocelyne Delk Adams. A great book with good recipes.  I am happy.  Thank you my lovelies! 😙

So today, I made myself this moist and soft Sugee Butter Cake with Rum. Mmmm...yummy! It's a big cake. So I decided to bake it into two small trays and gave one to my good neighbour.  So, not only am I happy but my neighbour is too.

Well, let's get on with the recipe shall we?  Right! All you need is:

300g butter
260g caster sugar
1 tsp salt
5 eggs
190g plain flour
1 tbsp baking powder
300g semolina
300ml fresh milk
1 tsp vanilla (I used 2-3 tbsp of rum)

1. Soak semolina with milk for 6 hours.
2. Grease and line 9 inch baking pan. Pre heat oven to 180 defree celcius.
3. Beat butter and sugar and salt until light and fluffy.  Add eggs one at a time, beat well after each addition
4. Stir in semolina and vanilla or rum. Fold in sifted flour and blend to mix.
5. Spread into baking tin and bake for 40-45 mins or until cake is done.

Enjoy with a cup of hot tea! 😆

Monday, April 25, 2016

Golden Bundt Nutella Cake

After many many months of busy weekends, finally I managed to bake this lovely plump looking bundt.

I was thinking of making marble cake using nutella instead of cocoa powder or chocolate. And I also wanted to make a bundt cake. So here's nutella marble and bundt cake in one!

This recipe is actually a plain pound cake but I added a couple of tablespoons of nutella to some of the batter for the marble effect.

It's a simple recipe and pretty fast to make.  Do try if you like a quick and yet delicious cake.  But, let me warn you. This is a large cake.


Golden Bundt Cake with a twist of Nutella

Pre-heat oven to 180 degree celsius
10 inch bundt pan spray with oil and coat with flour

3 cups flour
2 cups sugar
4tsp baking powder
1/2tsp baking soda
4 large eggs
1 1/2 cup (375 ml) mayonnaise
1/2 cup (125 ml) sour cream
2tbsp lemon zest
1 1/2tsp vanilla
4tbsp nutella

1.  In a large bowl, whisk together flour, sugar, baking powder and baking soda.
2. Add eggs, mayonnaise, sour cream, lemon zest and vanilla to flour mixture.
3. With an electric mixture beat the batter at medium speed for 1 min. Scrape the sides and mix at high speed for another min.
4. Divide the batter into half and mix one half with nutella.
5. Spread batter into pan alternate with nutella batter and bake for 40 - 45 mins or until done.


w

Sprinkle the top with some icing sugar if you like.  Serve with a cup of hot tea. Yumm!

Monday, January 4, 2016

Garlic Barbeque Pork Belly (Char Siu)

Happy New Year everyone!
Wish that 2016 will be a better year for all with all good blessings in health, luck, love, happiness and fortune!

To start off the year with more new recipes to try, here's the recipe for Char Siu which means barbeque.  This dish is very popular with the Chinese and we love this simple to make char siu.  If you have a big family, it's cost saving to make this as the ready-bbqued ones are expensive.

Basically it's strips of pork belly marinated with the garlic bbq sauce done the chinese way and then pan fried.  This is yummy eaten  with hot steaming rice.

All you need is:
Garlic Char Siu Sauce
2  whole gatlic, chopped
3 tbsp oyster sauce
4 tbsp light soya sauce
3 tbsp chinese wine
2 tsp five spice powder
500 ml water
1tsp cornflour mixed with 1 tbsp water for thickening

600 gm pork belly


Heat up 2 tbsp oil and saute chopped garlic until fragrant.  Add in the remaining ingredients and bring to boil. Lower heat  and boil for another 5 mins and thicken with cornflour mixture. Off heat and let cool.

Once cool, marinade the pork belly with this sauce for 3 hours or overnight.

Heat 1 tbsp of oil in a non stick pan and fry the pork belly for 5 mins on each side. Add 500ml water and bring to boil. Lower the heat and continue to cook untilmthe pork is tender and browned.  Once well cooked, dish up and let cool before slice it thinly before serving. 


Tuesday, September 1, 2015

Apple Roses Pie

Couple of months ago a friend of mine shared a video on how to make Apple Roses dessert video on Facebook and after watching it I'm hooked.  The video is from a food blogger called Cooking With Manuela and she has many wonderful recipes and videos. 

Here's my Apple Roses Pie.  It looks complicated but it's not.  So very easy and yet so pretty and delicious.  Don't worry, the link to this blogger and her video on how to make this is included below.
Have a go at this and your family will be awed by the beauty of this pie. :)


www.cookingwithmanuela.blogspot.com

http://www.cookingwithmanuela.blogspot.com/p/videos.html
 

Friday, August 21, 2015

Durian Pancake


Oh Gosh! Has it been 3 months since my last post?  Can't believe that its already end of August!

I have to admit that I've been neglecting my blogging for quite a bit.  Why?  Er.. not enough time?  Too busy? Lazy?  Well, all of those excuses but I would say it is all due to being more lazy than anything else. 

I also have to admit that I've not been visiting my fellow bloggers as often too.  Again, the excuses above! 

However, I've not been lazy in the kitchen though.  In fact, I've been very busy in my kitchen and might I add, have been a little bit more creative too.  I took pictures of those 'creative' baking and now I'm going to show you one of the goodies that I've recently made.  Er, maybe not that recent but at least about a month ago. :)

This is for all Durian lovers out there.  I, for one, am the greatest fan of the King of Fruits.  This pancake is so soft and just out of the world.  The crepe is so thin and the 'meaty' filling is just fantastic.

Take a look at these wonderful morsels and you can almost taste the custardly creamy filling and the aroma, oh.. just just heavenly!  Some of you might cringe your nose and stay as far as you can but for me, it's the sweetest smell ever! lol

The first time I ate this pancake was many years ago at one of the luxury hotel in KL.  After that I just had to make this which I did seven years ago.   Can you imagine, this is only the second time that I made this?  Hmm... why did I take so long to make this again? 

Durian is a seasonal fruit but can be found all year round.  The price however, is cheaper when the season is in though. 


Pancake Skin/Wrapper:
30g icing sugar
30g tapioca flour
15g plain flour
15g melted butter
8 eggs, beaten
190g water

Filling: 100 g whipping cream, whipped
200g durian flesh
Mixed both together until well mixed

1. To make the pancake skin, combine the ingredients in a mixing bowl and stir until smooth. Heat up a 15cm frying pan and pour enough batter mixture. Swirl the pan around so the base of the pan is evenly coated with thin layer of batter. Pour out excess batter into the mixing bowl. Shallow fry over low heat until the sides if the pancake curl up slightly, flip out the skin on to a plate.  Skin should be paper thin,
2. Spread the filling in the skin and fold into small parcels. Chill and serve immediately.


For All durian lovers, I do encourage you to try this out.  You'll never regret.  Enjoy!


Monday, May 4, 2015

Ice Cream Cone Cupcakes

I've seen cupcakes baked in ice cream cones in books but have never tried it.  Then one day, my daughter saw this on TV in one of Anna Olsen's episodes and requested that I replicate it for her.  Like most moms, of course, I said ok and did this for her.  Else, I'll never hear the end of her request.

It's actually quite fun to watch the whole family eating cupcake that looks like an ice cream.  This is great to serve at a party.  You can use any cupcake recipes and any frosting that you like.  Here, I made vanilla cupcake and lemon cream cheese frosting.  They tasted really good.

Get the flat-bottomed ice cream cone and fill them up 3/4 full. 

If you run out of ideas on what to do for your kids, do try making this.  They will be thrilled.
Enjoy!


Pavlova Has it been more than two years already since I've lain dormant?  Really?  Two whole years?!! Oh my... then it's about t...